Tuesday, May 31, 2011

Blur & Freeze Action | Bannack

Corey Rocks; 5/25/11, 5:52 pm; Bannack; f/8.0; 8 sec; Nikon D3100; tripod; I increased the saturation and contrast just a little in Camera Raw.

Julie Jumps; 5/25/11, 1:08 pm; Bannack; f/5.3; 1/1250 sec; Nikon D3100; Increased saturation in Camera Raw. I used the brush tool on her face in Photoshop.

Taking the freeze action shots were much easier than the ghost shots. We got some cool ones in the schoolhouse, where we had to try and retry to get the settings right. We figured out that on about a five second shutter speed, if the subject moves quickly after about 2.5 seconds, it produces a good 'ghost'. The one of Corey was a little easier after learning that. He was telling me about his guitar playing on the way to Bannack, when I saw him in the hotel, I said "you didn't tell me you brought it!" I think several of us got some good photos of him and his guitar. I like the angle of Julie jumping.

HDR | Bannack

The River; 5/25/11, 3:09 pm; Bannack; f/5.6; 1/80 sec; Nikon D3100; in Photoshop I used the brush tool- color burn mode to add a little more blue in the river. I loved the river and took many photos trying to show off its beauty. I found it using DynamicPhoto.

I couldn't find my original photo of the river, but it looked about like this. 5/25/11, 4:05 pm; f/5.3; 1/640 sec; Nikon D3100


Hotel Meade; 5/25/11, 1:00 pm; Bannack; Darkest: f/11, 1/500 sec, -2 exposure compensation; Mid: f/8.0, 1/250 sec; Lightest: f/5.3; 1/125 sec, + 2 exposure compensation; Nikon D3100; tripod; -2.0, 0, + 2 exposure


Doorknob; 5/25/11, 3:09 pm; Bannack; f/5.6; 1/80 sec; Nikon D3100

HDR was fun! I really like what I was able to do with single images. Some of the effects I think you can reproduce in Camera Raw, but I love what DynamicPhoto did with these images. The sky was a bit light all day, and I think I got lucky with these shots.

Reverse Shallow Depth | Bannack

Church Foreground; 5/25/11; 3:14 pm; Bannack; f/5.6; 1/2500 sec; Nikon D3100; Increased the sats and Contrast in Camera Raw

Church Background; 5/25/11; 3:14 pm; Bannack; f/5.6; 1/2500 sec; Nikon D3100; Increased Sats and Contrast in Camera Raw

I like this artistic effect that's easy to produce by focusing one one thing or another. I loved the fences at Bannack. I took several photos using the fence as a focus or blur in the foreground, but I liked this image of the church. They didn't have much done by way of editing, just enhanced them a little in Camera Raw.

Macro Abstract | Bannack

I placed the wood photo on top of the spices photo and used the overlay blending mode. I reduced the opacity until I liked the shot. I thought it added well to the saloon counter, making it look older.

Spices; 5/25/11; around 4:00 pm; Bannack; f/8.0; 1/60 sec; Nikon D3100

Wood; 5/25/11; 12:45 pm; Bannack; f/9.0; 1/320 sec; Nikon D3100

After I blended these two images using the sharp light mode, I darkened some of the texture on the table and on the right side of the wall. I added the torn edges filter on the texture layer. I thought the red that came out in the texture looked cool.

Cups; 5/25/11; around 4:00 pm; Bannack; f/6.3; 1/60 sec; Nikon D3100

Dirt; 5/25/11; 4:21 pm; Bannack; f/8.0; 1/125 sec; Nikon D3100

Portraits | Bannack

Fur Suits Her; 5/25/11, ? pm; Bannack; f/5.6; 1/125 sec; Nikon D3100; I darkened the background in Camera Raw, lightened up a few strands of her hair with an adjustment brush, and lightened up the light side of the hat. In Photoshop I brightened up her eyes just a little with the brush tool, using color burn and lighten modes. Also using the brush, I went over her skin just a little. Really, she looked amazing from the start.

Hotel Hall; 5/25/11, 1:49 pm; Bannack; f/5.0; 1/20 sec; Nikon D3100; The saturation and contrast were increased in Camera Raw. In Photoshop I smoothed the shadows a bit on her face with the brush tool and cropped it a bit.

End of the Day; 5/25/11, around 6:00 pm; Bannack; f/5.0; 1/1250 sec; Nikon D3100; I darkened up the shirt using the color burn mode on the brush tool. I brightened up his eyes also using the bolor burn and lighten modes on the brush, but again I liked this photo in the camera.

Saloon Princess; 5/25/11, around 1:00 pm; Bannack; f/5.6; 1/125 sec; Nikon D3100; I decreased the saturation in Camera Raw, brightened the exposure of her face, and lowered the exposure in the window. I also added a little vignette. In Photoshop, I put on a gassian blur using an adjustment layer, then masked it out around Becca. I smoothed out the shadows on her face a little using the brush tool.

I had so much fun taking portraits at Bannack! I ended up with a lot of great ones, the models were fabulous! Thank you to all who posed.

Favorites | Bannack

Gotta get the Truck; 5/25/11; 2:20 pm; Bannack; f/13; 1/640 sec; Nikon D3100. I decreased the saturation and increased the contrast in Camera Raw. I also lightened the exposure on the truck using an adjustment brush. In Photoshop, I added a smart filter-underpainting.

The Masons; 5/25/11; 2:20 pm; Bannack; f/13; 1/640 sec; Nikon D3100. I decreased the saturation and increased the contrast in Camera Raw.

Boots; 5/25/11, 1:49 pm; Bannack; f/5.6; 1/125 sec; Nikon D3100; In Camera Raw I boosted the Sats and contrast using an adjustment brush on the boots. I also darkened the bacground on the right side. In Photoshop, I selected the boots and put a blur in the background.


Old Town; 5/25/11; 12:56 pm; Bannack; Darkest: f/18; 1/1250 sec; -2 exposure compensation Mid: f/13; 1/640 sec, Lightest: f/9.0; 1/320 sec; + 2 exposure compensation; Nikon D3100, tripod. I selected the Sepia Effect in Dynamic Photo.

Wagon View; 5/25/11, 3:00 pm; Bannack; f/8.0; 1/1000 sec; Nikon D3100; I increased the saturation and contrast in Camera Raw. I darkened the ground under the wagon and also added a bit of blue to the mountain. In Photoshop I took out some barrels and replaced them with grass using the content-aware-fill and the clone stamp tool. I put a gradient on the sky to add a little more blue.
Mason House; 5/25/11, 12:37 pm; Bannack; f/5.0; 1/2000 sec, Nikon D3100. I boosted the Saturation in Camera Raw, and brightened up the front of the building. In Photoshop, I took out a couple of objects that were on the lawn using selection tool and content-aware- fill

Attitude; 5/25/11, 1:21 pm; Bannack; f/4.8; 1/1000 sec; Nikon D3100; 55-200 mm lens; I lit up her face a little in Camera Raw, as well as increased the blacks just a little.

Reflection; 5/25/11, 3:49 pm; Bannack; f/8.0; 1/250 sec; Nikon D3100; I increased the contrast in the wood of the window in Camera Raw, and increased the color of the bottles. And in Photoshop I used the clone stamp tool to take out the reflection of a man.

Through the Wheel; 5/25/11, 1:30 pm; Bannack; f/4.5; 1/400 sec; Nikon D3100; Increased Saturation in Camera Raw, and using adjustment brushes, Iincreased the contrast in the foreground and lightened the front of the Mason building.

Meade; 5/25/11, 1:09 pm; Bannack; f/5.0; 1/400 sec; Nikon D3100; In Camera Raw I increased the saturation and contrast. I cropped it in Photoshop.

Guitar; 5/25/11, 5:56 pm; Bannack; f/4.2; 1/40 sec; Nikon D3100; The saturation and contrast are increased in Camera Raw. I cropped it in Photoshop.

Beer?; 5/25/11, 4:38 pm; Bannack; f/5.6; 1/50 sec; Nikon D3100; I darkened the wall in Camera Raw. In Photoshop I blurred it and cropped just slightly.

I obviously had a hard time narrowing down my favorites, but more than that I wanted to add a variety. I wish we would have spent more time indoors, but there was just so much to see and do outside! Besides being a really cool ghost town, the location was beautiful and the weather was perfect! I loved the opportunity to get to know my classmates and become friends. I am learning so much from them and their unique talents. What an amazing experience this was.

Sunday, May 22, 2011

Portraits


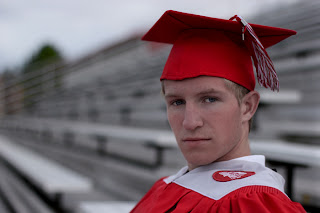
Side Composition-Graduate; 5/18/2011, 7:51 pm; Rexburg Idaho-Madison HS track; f/2.0; 1/4000 sec; Canon Rebel T2i, 50 mm 1.8 lens
I took this picture of my brother at the old high school track. My friend let me borrow her fancy lens and camera and I loved the blur it gave me! In camera raw I increased the saturation and blacks, then took it to Photoshop and copied the layer. Then I evened out his skin using the paintbrush tool. I used the burn and dodge tool on his eyes to make them stand out a little.


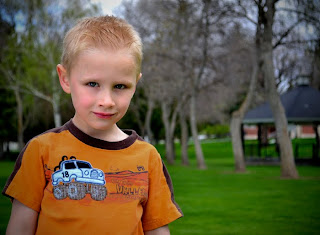
Side Compositon- Lucky Shot; 5/19/2011, 2:24 pm; Rexburg, Idaho-Smith Park; f/5.6; 1/640 sec; Nikon D3100, reflector
For this photo, I used the gold reflector as a secondary light source. It was really helpful in the sunlight. In most of his photos he pulls crazy faces, but this one was nice. I increased the saturation just a little on everything except his shirt since it's bright orange, and also darkened the background in camera raw. I also added a vignette. In Photoshop, I enhanced his eyes with the paintbrush on color burn and color dodge mode.


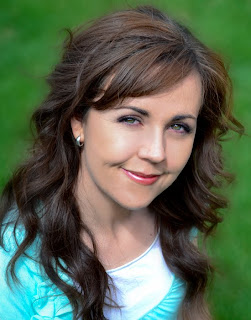
Head & Shoulders-Joelle; 5/19/2011, 4:09 pm; Rexburg, Idaho; f/5.6; 1/320 sec; Nikon D3100
Joelle was so easy to take photos of! Every pose was beautiful. In Photoshop I copied the background layer, then airbrushed her face using the paintbrush tool on 30% opacity, 30% flow. I adjusted the roots of her hair also, using the overlay mode of the paintbrush. I used a smart filter to get the gaussian blur on the background.


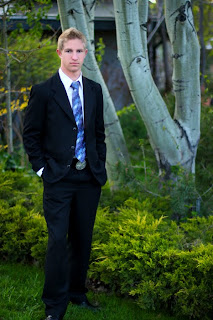
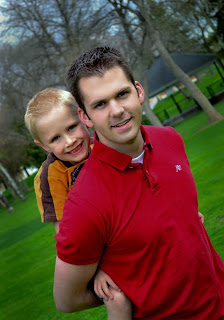
Full Body-Future Missionary; 5/18/2011, 8:32 pm; Rexburg, Idaho; f/1.6; 1/400 sec; Canon Rebel T2i, 50 mm 1.8 lens
I increased the saturation and contrast of this photo in Camera Raw, then in Photoshop enhanced his skin and eyes just like in the previous photos. To add just a slight vignette this time I did it in Photoshop under lens correction. I thought the evening light was really nice and it was a different kind of light than the other photos.


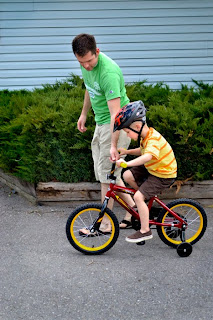
Group Activity-First Bike; 5/21/2011, 12:50 pm; Rexburg Idaho; f/5.0; 1/1000 sec; Nikon D3100
This is my son's first bike, and he was a little cautious on his first few rides. I enhanced the color and increased the contrast using adjustment layers in Photoshop. I toned down the yellow with the mask. It is cropped slightly.


Group posed-Buds; 5/19/2011 2:33 pm; Resburg, Idaho-Smith Park; f/5.6; 1/500; Nikon D3100
I didn't do much to this photo, just increased the saturation and blacks a little, then enhanced their eyes using the paintbrush in color burn and color dodge mode. I evened out the light a little also by using the paintbrush tool. I gave it a slight vignette in lens correction.


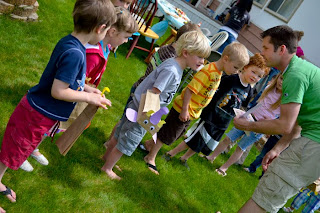
Group Activity- The Birthday Party; 5/21/2011, 1:28 pm; Rexburg Idaho; f/4.8; 1/4000 sec; Nikon D3100
I loved how all the kids lined up to receive instruction. I increased the sats on this photo, and brightened up Adam's face (the adult) using an adjustment brush in Camera Raw. I blurred the background slightly in photshop on a copied layer.


Group Environment-Market; 5/20/2011, 4:20 pm; Rexburg Idaho-Farmer's Market; f/5.0; 1/200 sec; Nikon D3100
I discovered it's hard to get good candid shots! I liked this one because the composition is nice, and the environment was interesting. I increased the saturation and blacks in camera raw, then used an adjustment layer in Photoshop to blur the unimportant background. I brightened up their faces a little using the lightening mode of the paintbrush.

Enhancements


Original

Enhancement-Perfect Model; 5/19/2011, 4:06 pm; Rexburg, Idaho; f/5.6; 1/800 sec; Nikon D3100
On Joelle's portrait I increased saturation and blacks in Camera Raw first. Then in Photoshop, I copied the background to do my editing. I brightened up her eyes using the paintbrush tool, in the color dodge and lighten modes. I also used the paintbrush tool on her skin, on a 30% opacity and flow, selecting different pixels as I went. I used the spot healing brush on just a few places. To blend her hair at the roots I used the paintbrush tool-both color dodge and overlay modes.


Original

Color Replace-Chubby Cheeks; 5/21/2011, 2:32 pm; Rexburg, Idaho; f/5.6; 1/100 sec; Nikon D3100
To replace the color of the shirt, I first made a selection using the quick select tool. Then I went to Image-Adjustments-Replace Color. I increased "fuzziness", selected the pixels in his shirt with the eyedropper tool, then moved the 'hue' to red. I increased the saturation and darkened the color a bit.


Original; 5/18/2011, 8:12 pm; Rexburg, Idaho-BYUI Center; f/1.6; 1/60 sec; Canon Rebel T2i


Color Match; 5/18/2011, 8:14 pm; Rexburg, Idaho-BYUI Center; f/1.6; 1/1000 sec; Canon Rebel T2i


Color Match After- It was difficult for me to find a couple of photos that this would work on. This was the only one that had a lighting problem. So to catch the color, I opened both images, and selected the one with the lighting problem. I went to Image-Adjustments- Match color. I selected the other image as the Destination Image. I realize these aren't the best images, but I did not correct them in Camera Raw so that the color match effect would work. I did smooth his skin using the paint brush on 30% opacity and flow, and also brightened his eyes in color dodge and burn.

Saturday, May 14, 2011

Panoramics


1. Bridge; 5/13/2011, 4:48 pm; St. Anthony, Idaho; f/14; 1/800 sec; Nikon D3100.
2. Mrs. Hobley's Class; 5/12/2011, 10:37 am; Rexburg. Idaho; f/14; 1/500 sec; Nikon D3100

I had a lot of fun with Panoramic images! I practiced with several groups of photos I took, and I really got the hang of the process. To make these panoramas, I selected 'Photomerge' in photoshop, then selected my images. Then, I added a new layer and under Image, hit "Apply Image'. I used the magic wand tool on some of the sky and foreground and selected fill-content aware to fill in the missing parts. I used the lasso tool on the Bridge photo to get rid of a few road signs also with Fill-Content Aware. Then I cropped the images. Next, I used adjustment layers to increase the saturation, levels, brightness and contrast. I blended the sky with the clone stamp. To turn Mrs. Hobley's Class into a polar-panorama, I changed the dimensions of the image to a square, then rotated it 180 degrees. Then hit Filter-Distort-Polar Coordinates and checked the 'Rectangle to Polar' option. All I had to do after that was blend the sky and grass a little with the clone stamp. I thought it turned out pretty fun!